
Have you ever experienced the frustration of your portable generator suddenly stalling or refusing to start? It is a common issue that many generator owners face, and one possible culprit could be a faulty ignition coil.
But fear not, “Mechanic Guide” is here to help. Step-by-step instructions will guide you through the process of how to replace the ignition coil for your open-frame models, like Generac, Honda, Briggs & Stratton, etc., with complete, detailed instructions, images, and video to ensure a successful ignition coil replacement.
If your generator is acting up, like randomly shutting down or misfiring, backfires after running for only a short time, such as 10 or 15 minutes, if any of these symptoms are observed, it is a good idea to consider the ignition coil as a possible cause. In such cases, replacing the ignition coil might help resolve the issue.
Ignition Coil Replacement for Open-Frame Generator
How to Replace Ignition Coil in Your Traditional Generator?
First, turn it off and let it cool. Locate the ignition coil near the engine or under the recoil cover, and disconnect the spark plug boot. Unscrew the recoil housing, then remove the old coil by unscrewing it and disconnecting the wires. Finally, install the new coil securely then reconnect the wires, and test the generator.
Tools and Materials
- Screwdriver
- New ignition coil
- Needle nose pliers
- Safety gloves & goggles
- T-handle socket wrench 10-millimeter, 8-millimeter, both
Safety First, before starting any maintenance work on your generator, ensure the generator is turned off and the spark plug wire is disconnected to prevent accidental starts. Wear safety goggles and working gloves to protect yourself from potential injuries.
Step 1: Access the Ignition Coil
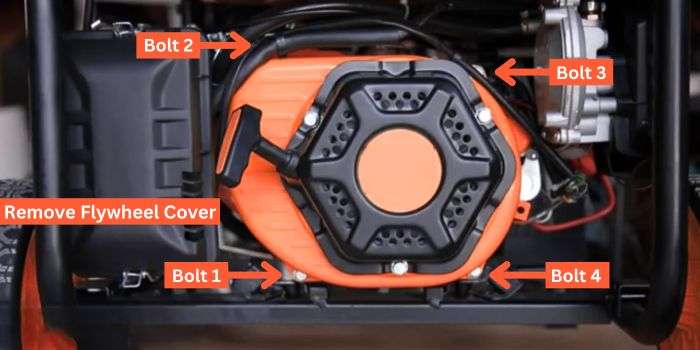
The ignition coil is typically located near the engine. You may need to remove the generator’s cover or access panel to reach it.
Now, take a look at your generator engine flywheel cooling cover. You’ll find either 4 or 5 bolts holding it on. Grab a 10-millimeter socket, remove these bolts, and if needed, use a flathead screwdriver to remove any wire clips. Once you’ve got those off, you can take off the engine shroud and the recoil housing.
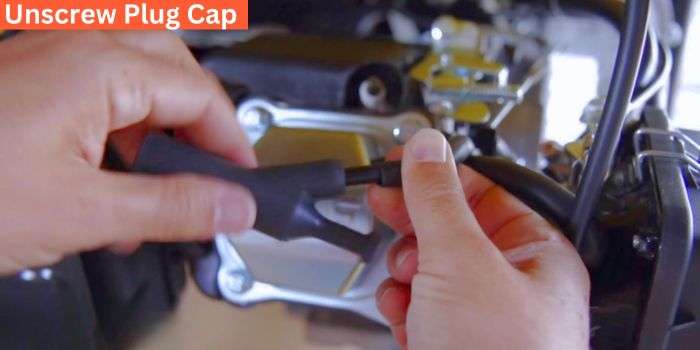
Step 2: Unscrew the Wires Boot
After accessing the ignition coil, identify the wires connected to the ignition coil. Simply follow the spark plug wire back to the ignition coil. Carefully unscrew the spark plug cap, and then follow the other set of wires leading underneath the panel.
Disconnect the wire connector and make sure to free the wires from any tabs that are holding them in place. These may include the spark plug wire and one wire connecting the ignition switch or electrical connections.
Gently disconnect these wires, making sure to remember their positions for reconnection later.
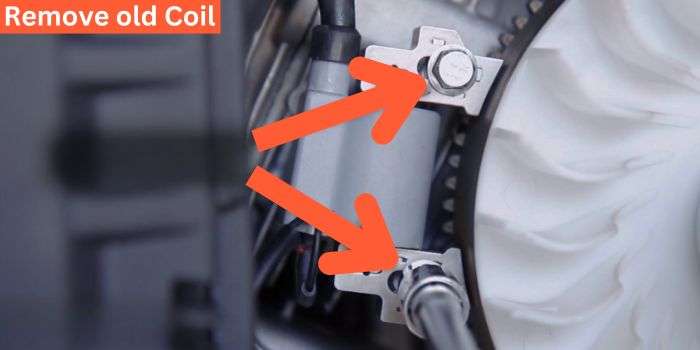
Step 3: Remove the Old Ignition Coil
With the wires disconnected, you’re ready to remove the old ignition coil. There are two (2) bolts holding it in place. Grab your trusty 10-millimeter socket again and use it to remove those bolts.
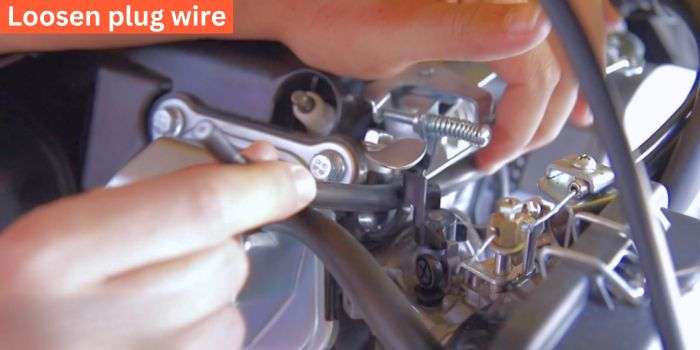
Loosen the spark plug wire from the insulator and thread it back through the gap in the carburetor housing. This will allow you to fully remove the old ignition coil.
Step 4: Install the New Ignition Coil
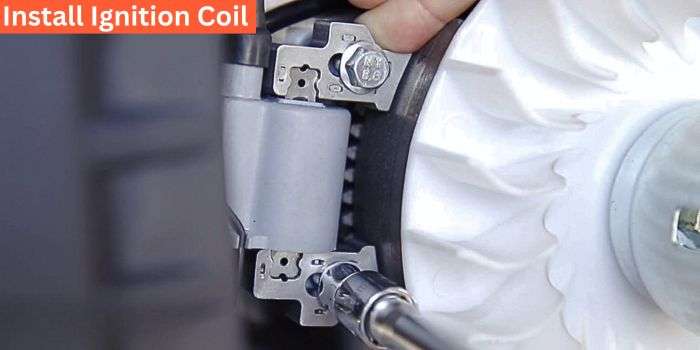
Now, it’s time to install the new ignition coil. Slip it around the flywheel, making sure it’s positioned correctly. Loosely replace the two bolts, and push the ignition coil as far away from the flywheel as you can. Then, tighten up those bolts normal not full tight.
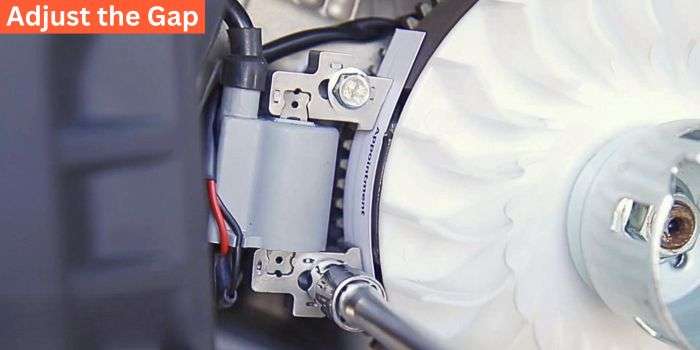
Step 5: Adjust the Gap (Coil to Flywheel)
The most important setting when adjusting the ignition coil to the flywheel on a portable generator is the air gap between the ignition coil and the flywheel magnet.
The air gap is crucial because it determines the strength of the magnetic field generated by the flywheel magnet, which in turn affects the spark produced by the ignition coil. If the gap is too large, the spark may be weak or nonexistent, causing ignition problems.
If the gap is too small, it can lead to the coil and flywheel making contact, potentially damaging both components.
Finally Adjustment
With everything in place, rotate the flywheel until the magnet lines up with the ignition coil. To make sure it’s spaced correctly, grab a business card and cut it in half lengthwise. Use one half as a spacer between the ignition coil and the magnet.
Loosen the two bolts slightly so that the ignition coil fits snugly against the magnet, then give those bolts a good, final tightening with your 10-millimeter socket.
Now, rotate the flywheel to make sure the ignition coil isn’t hitting or rubbing against any part of the flywheel or magnet.
Step 6: Reconnect the Wires
After you adjust the coil gap, attach the wires you disconnected from the old ignition coil to the corresponding terminals on the new coil. Reattach the spark plug cap, and double-check the connections to avoid any loose wires.
Step 7: Replace the Cover or Housing
Start by reattaching any recoil pull starter covers you removed during disassembly and carefully placing them back in their original positions. Use a 10-millimeter socket again and tighten them securely, but be careful not to overtighten, as it may cause damage.
Reattach the spark plug wire boot to the spark plug. This connection is crucial for proper ignition and generator operation.
Final Test the Generator
Before reassembling the generator, it’s a good idea to test it to ensure the new ignition coil is working properly. By testing your generator after replacing the ignition coil, you’re making sure it’s ready for action whenever you need it.
If anything seems off during testing or if you notice any quirks, maybe a spark plug change or air filter cleaning is required otherwise, consult your manual or consider reaching out to your nearby certified mechanic.
Proper testing and maintenance will keep your generator running smoothly for a long time to come. issues.
How Much Does It Cost To Replace An Ignition Coil?
The cost to replace a generator ignition coil can vary depending on several factors such as the make and model of the generator, the quality of the replacement part, and whether you’re doing the replacement yourself or hiring a professional.
Typically, ignition coils for generators range in price from $20 to $100 on average, contingent upon the brand and specifications. If you choose to replace the coil yourself, you can save on labor expenses, although this may necessitate investing time and effort into the task.
Alternatively, hiring a professional mechanic or technician for the replacement will likely incur additional labor fees, which can vary depending on the service provider’s hourly rate.
Labor costs for replacing ignition coils are usually billed by the hour. On average, hourly rates can fall between $50 and $100, varying based on the location and the repair facility. The duration of labor needed for ignition coil replacement may range from 0.5 to 1 hour, contingent upon the generator’s structure.
Conclusion
Changing the ignition coil in your traditional generator is an essential maintenance task that can enhance its performance and extend its lifespan.
By following this step-by-step guide, complete with detailed images and video, you can confidently replace the ignition coil and ensure your generator continues to provide reliable power for your needs.
Remember, if you’re uncertain or uncomfortable with any step or if your generator’s model has specific instructions, it’s always a good idea to consult a professional technician nearby area.
FAQs
Can I Change Ignition Coil Without Professional Help?
Absolutely! Changing the ignition coil is a task that can be done by most DIY enthusiasts. Just follow our guide for a successful replacement.
Why is Changing the Ignition Coil Important?
The ignition coil plays a crucial role in generating the spark that ignites the fuel-air mixture in your generator’s engine. A faulty coil can lead to starting problems and poor performance.
How do I know Ignition Coil Needs Replacement?
If your generator is having trouble starting, misfiring, or running erratically, a faulty ignition coil might be the culprit. A professional diagnosis is recommended.
Are There Any Risks Involved Changing the Ignition Coil?
While it’s a relatively simple task, safety is key. Always disconnect the spark plug wire and work in a well-ventilated area. If you’re uncertain, it’s best to seek professional assistance.


