
Newley generator owners don’t realize that they have bought a mechanical device, they think that it is an electronic device that only generates electricity, but when that generator stops working, they call a mechanic.
As a mechanic, we ask them when you change the oil of the engine, and say that they did not change the engine oil, which is the reason that the parts inside the engine get damaged. Or the oil sensor on it turns auto-off the generators due to low oil levels.
But don’t worry, Mechanic Guide is here to explain how to change generator oil within 8 steps, with images or videos.
So, How To Change Generator Oil (Quick)
Begin by starting the generator to heat the engine oil. Next, position it on a flat, higher surface, disconnect the spark plug wire, find the drain plug, set up a drain pan, and use a socket wrench to loosen the drain plug bolt. Once the draining is complete, reattach the drain plug, open the oil fill cap, and add fresh oil.
Tools and Materials Needed (List)
- New oil (owner’s manual recommended)
- Oil drain pan
- Oil funnel
- T-handle or socket wrench (correct size)
- Oil filter (if applicable)
- Oil filter wrench (if applicable)
- Protective gloves
- Rags or paper towels
Safety should always be a top priority when changing generator oil. Wear protective gloves, and start the generator for a few minutes to warm up the engine oil before starting this procedure.
Step 1: Warm Up the Existing Oil
When engine oil gets cold and old, it becomes thick and sticky. As a result, certain deposits in the oil tend to sink to the bottom of the engine.
To begin the oil-changing process, warm up the existing oil within the generator’s engine.
This facilitates smoother drainage, as hot oil possesses a more liquid consistency.
Start the generator and let it run for 10 to 15 minutes, allowing the old oil to reach an optimal temperature. Once sufficiently warmed, turn off the generator and proceed to the next step.
Step 2: Elevate the Generator on Blocks
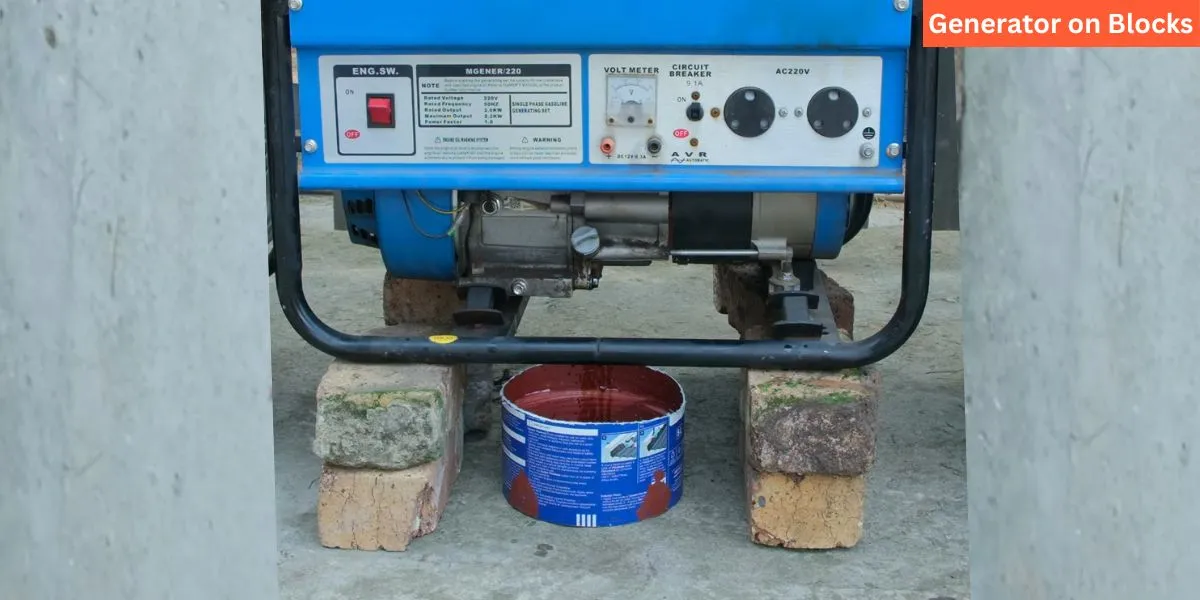
Be sure to stabilize the working environment by placing identical blocks on a level surface.
The reason for placing it on the blocks is to have some extra space to work with.
This ensures easier access to the oil drain plug and enhances overall maneuverability during the procedure.
If the generator is large or heavy weight, such as a quiet diesel or stationary generator, it’s not easy to move. So, you might need to bend down a bit for the oil replacement.
Step 3: Disconnecting the Spark Wire
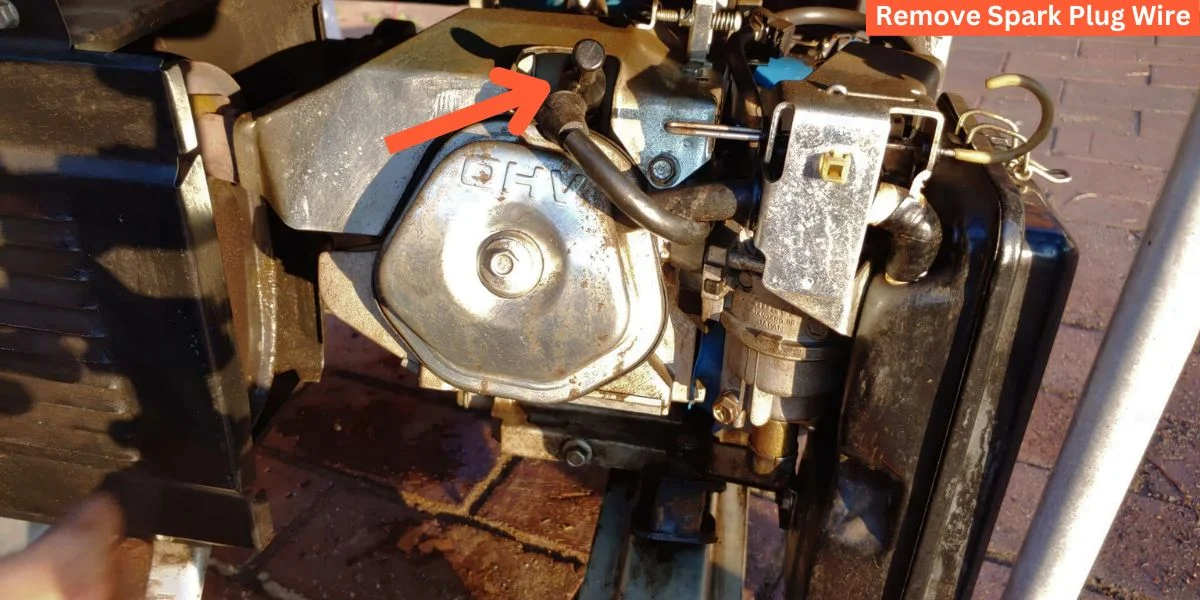
With the generator securely placed on stable blocks, locate the spark plug boot and disconnect it to prevent accidental engine starts without oil.
Refer to your owner’s manual if you encounter difficulty finding the spark plug location.
Step 4: Ready for Draining Used Oil
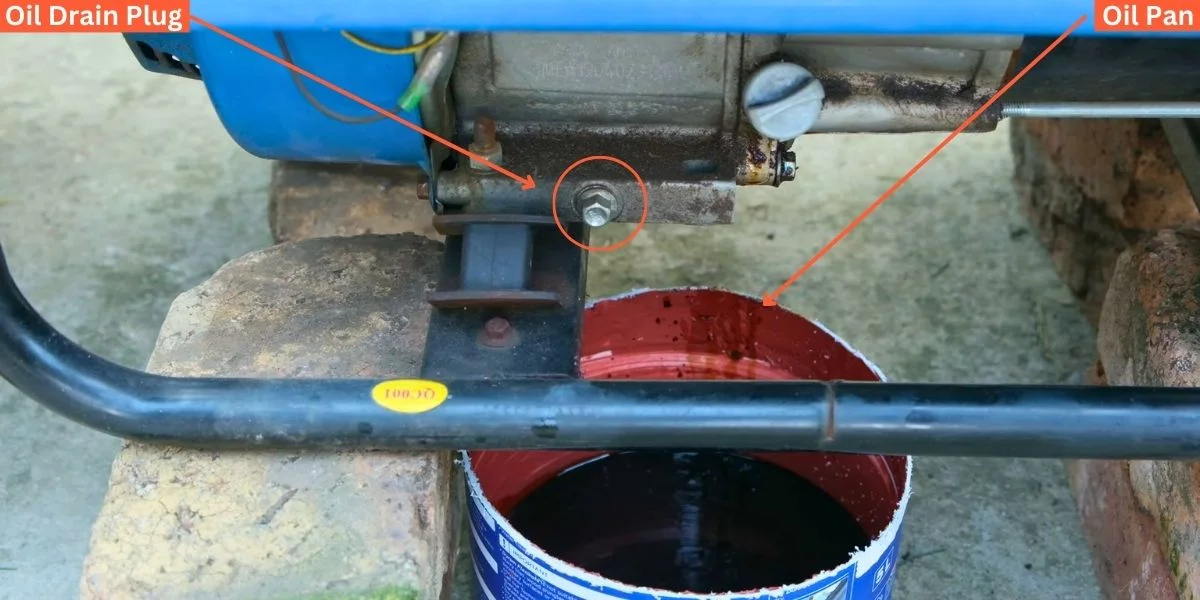
Locate the oil drain plug or tube on the bottom of the engine, typically a 3/8″ nut with a square or hexagonal head.
Refer to the owner’s manual for specific details on your generator drain plug or tube location.
After finding the drain plug location, clean the area around the drain plug using a paper towel to ensure a clear view.
Place an oil pan or a leak-proof container under the drain plug to catch every drop of the old oil.
Step 5: Unscrew the Oil Plug
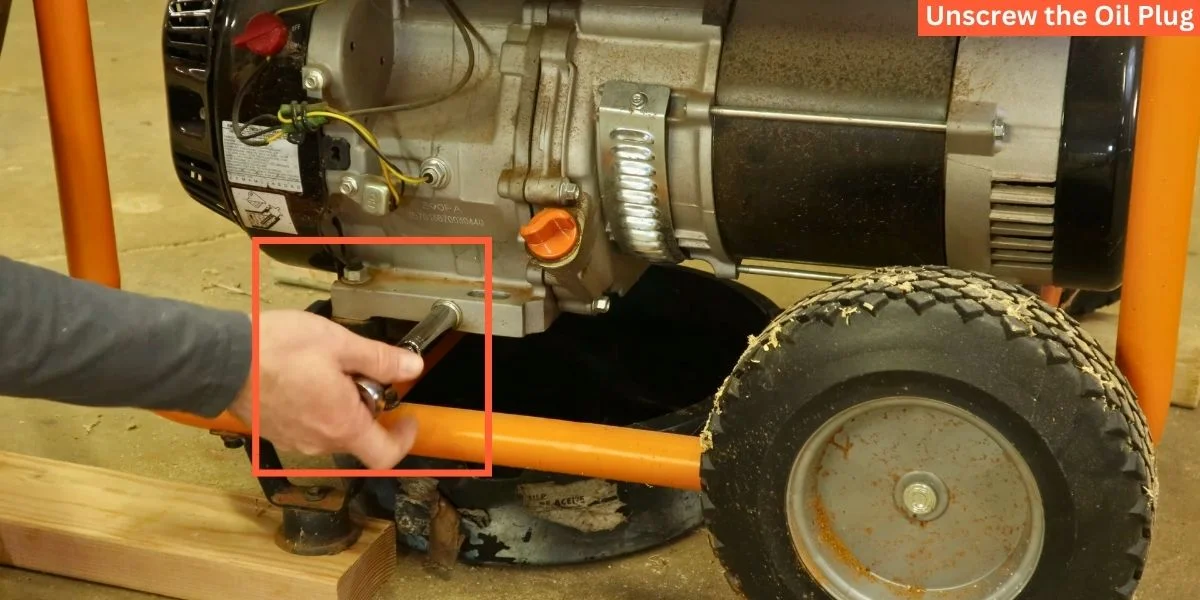
With the drain pan in position, use a ratchet and a 3/8″ socket to loosen the oil drain plug.
Once loosened, remove the ratchet and socket, unscrewing the rest of the threading manually. Carefully remove the drain plug to allow the used oil to drain completely.
Collecting every drop in the pan to prevent environmental contamination.
Step 6: Insert the Drain Plug and Pour Fresh Oil
After collecting the old oil, reinstall the oil drain tube or plug manually, and then tighten it with a socket wrench, but not overtight.
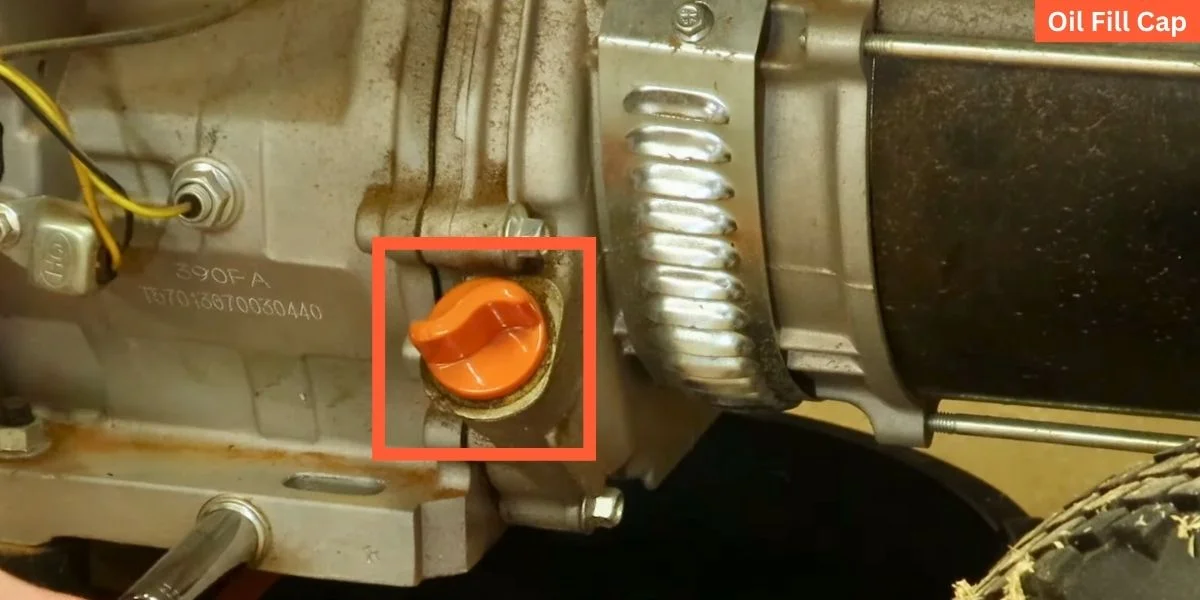
Remove the oil fill cap, then insert a funnel and refill the new oil into the hole. in the recommended amount of oil, use a dipstick to check the oil level. Be sure not to overfill, then reinstall the oil fill cap.

The capacity of oil the generator can hold depends on the brand and model. The amount of oil differs between models, typically ranging from 1.1 to 1.9 quarts.
Refer to the owner’s manual for specific oil type and volume details. Use high-quality oil for enhanced engine protection.
However, it’s advised by most generator manufacturers to use high-quality detergent oil specifically built for portable engines.
Commonly used oils for traditional generators include SAE 10W-30, which is suitable for most types of generators and commonly used in small engines.
Step 7: Change the Oil Filter or Air Filter
If your generator does not include an oil filter, skip this step or jump to replace or clean the air filter. Every stationary generator and some portable traditional generators will include an oil filter.
Oil Filter
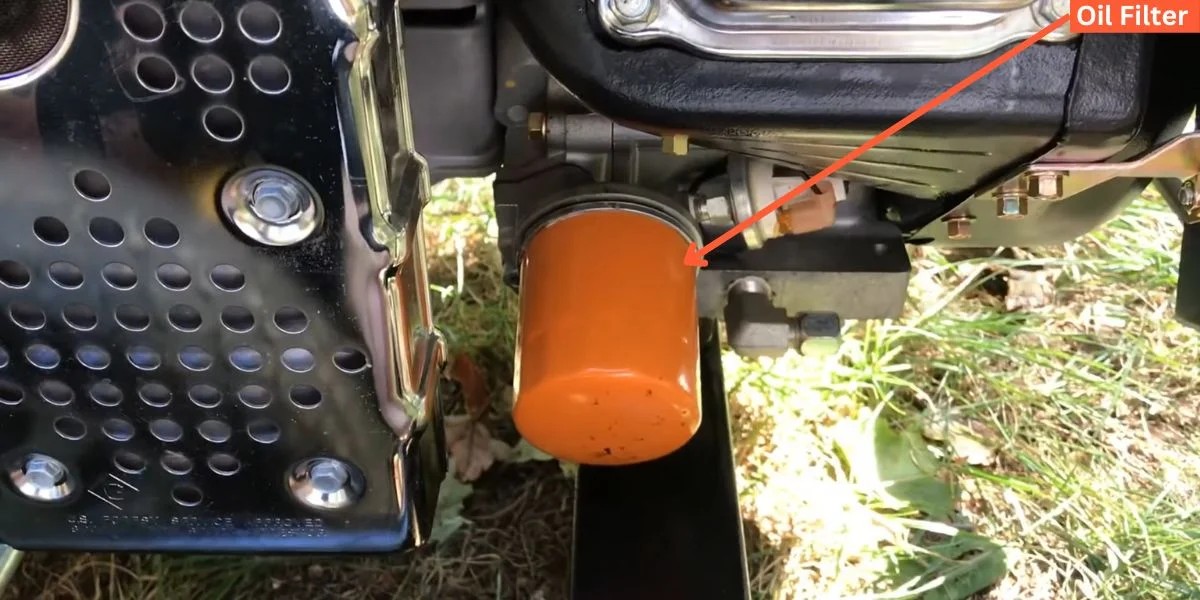
Replace it with a new one. Use a high-quality oil filter, and use a wrench to loosen and remove the old filter.
Be sure you wear protective gloves due to the potential heat of the oil filter. Clean the oil filter adapter, lubricate the new filter’s rubber gasket, and securely install it, preventing leaks and maintaining engine health.
Air Filter
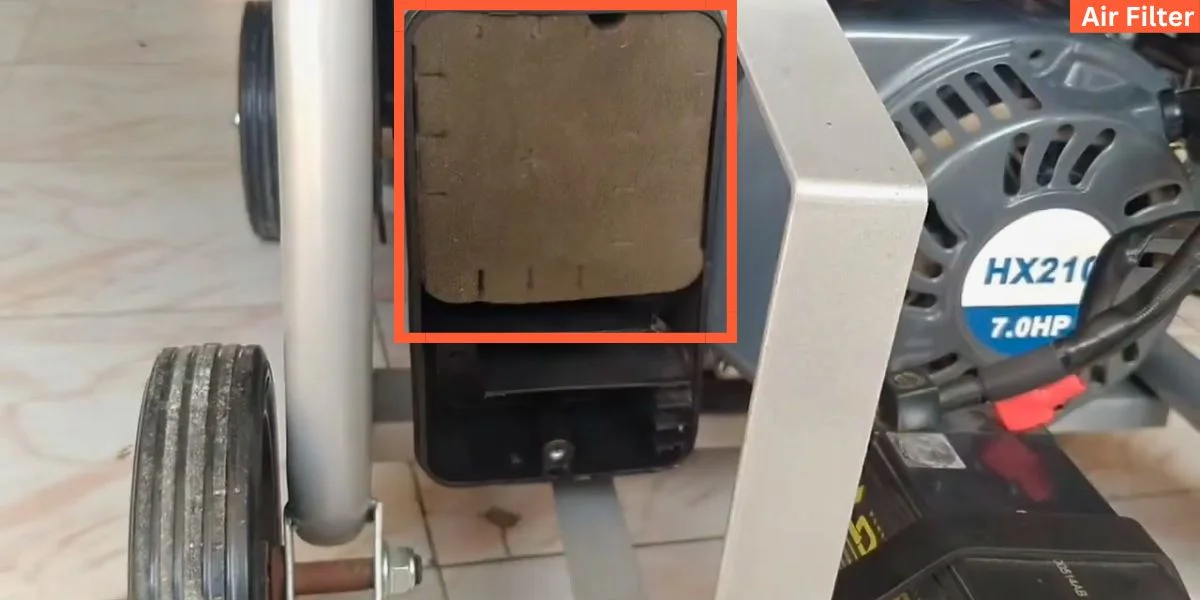
If your generator uses an air filter, commonly all open-frame generators, and portable inverters, like Duromax, Firman, Champion, Generac, Honda, and Yamaha, use air filters. Replace it with a new one otherwise, clean it now.
Step 8: Reattaching the Spark Plug Wire
After concluding the process, re-connect the spark plug wire. Slide the wire boot over the plug and press it in until fully secured. Listen for a click to ensure a proper connection.
Now start the generator, letting it run for a few minutes to distribute the clean oil and lubricate the engine.
After a couple of minutes, stop the generator, check the oil level, and add more if necessary.
Last, it’s your responsibility to dispose of used engine oil and oil filters. Local auto parts stores or service stations often provide proper disposal services. To find the nearest recycling center, you can visit this website. Before visiting, make a quick call to inquire whether they accept both used motor oil and oil filters.
How Often to Change Generator Oil?
The frequency with which you should change the oil in a generator depends on several factors, including the type of generator, its usage, and the manufacturer’s recommendations.
New Generators: If you buy a new generator, it’s my personal experience as a mechanic that it’s often recommended to change engine oil for the first time after 30 to 50 hours of operation. This initial oil change helps remove any contaminants that may have been present during the break-in period.
Regular Use: For generators that are used regularly, the oil should be changed approximately every 50 to 100 hours of operation. This time can pass quickly, especially if your unit is consistently running during a power outage. That’s why we suggest adding oil whenever you refuel and performing a complete oil change every 100 hours of use.
This is a common recommendation, but it’s crucial to check the owner’s manual for your specific generator model, as recommendations can vary.
Infrequent Use: If your generator is used infrequently or is used for standby purposes, it’s still essential to change the oil for some time. Even if the generator hasn’t been used much, oil can degrade over time due to factors like temperature fluctuations and moisture.
Synthetic vs. Conventional Oil: Some generators use synthetic oil, which generally has a longer lifespan than conventional oil. If your generator uses synthetic oil, you may be able to extend the oil change interval, but it’s essential to follow the manufacturer’s recommendations.
Video Guide to Changing Oil
If you have any problems or difficulty with this oil-changing process at certain points, then you can watch this video.
Conclusion
I hope you are a master in the process of how to change generator oil, which is a valuable skill for generator owners. It is highly recommended to closely monitor the oil level of your generator. Ignoring to change the oil when necessary or allowing the oil level to decrease may cause issues.
FAQs
Can I Use Any Oil For My Generator?
The type of oil you should use for your generator depends on the make and model of the generator. You can consult your generator’s manual to determine the recommended type and viscosity of oil.
What Happens If You Don’t Change Generator Oil?
After a while, the oil can get dirty with stuff like dirt and leftovers from burning fuel. This makes the oil not work well. It can cause the generator engine to have issues like less lubrication, more friction, and higher temperatures. This might harm the engine’s internal parts.
Does Generator Oil Need to Be Warm Before Changing?
Yes, it’s highly recommended that warm oil make it easier to drain. Warm oil flows better and helps clean out any dirt or bad stuff in the engine.
Do You Need to Change Oil Filter After Every Oil Change?
You don’t have to change the oil filter every time you change the oil, but it’s a smart thing to do. The oil filter helps keep the engine oil free from big dirt, and changing it when you change the oil ensures everything works well.
Can I Change the Generator Oil Myself, or Should I Hire a Professional?
Changing the oil yourself is possible with the right tools and knowledge. However, if you are not confident, consulting a professional is recommended.


